How to Drain an Outdoor Shower
To drain an outdoor shower, shut off the water, open the faucets, drain the supply lines, and clear the floor drain. Remove trapped water before freezing weather, then leave valves open so expanding water has room to escape.
On this page (10 sections)
- When should you drain an outdoor shower?
- What supplies do you need before you start?
- How do you shut off and empty the supply lines?
- How do you drain the shower floor and base?
- What if your outdoor shower drain is slow or blocked?
- How do you protect exposed pipes from freezing?
- Can you use antifreeze or compressed air?
- How do you restart an outdoor shower in spring?
- How do you choose parts that make draining easier?
- What is the fastest draining routine to remember?
To drain an outdoor shower, shut off the water, open the faucets, drain the supply lines, and clear the floor drain.
Emptying trapped water before freezing weather protects pipes and fittings, and a clean floor drain lets the last rinse water leave the base.
This guide explains how to drain an outdoor shower in a safe order.
You will empty the lines, handle the floor drain, protect exposed plumbing, and prepare the shower for spring.
The steps fit a fixed backyard shower with a shower base, drain, and exposed supply lines.
When should you drain an outdoor shower?
Drain an outdoor shower before the first hard freeze and any time you will store it unused through winter.
Also drain it if a cold snap is forecast and the supply lines sit above ground. Shut it down earlier if nights often drop below freezing, since pipes can freeze during one cold night.
Water left in a horizontal run has nowhere to expand. An outdoor shower can use a permanent base, a portable frame, or a simple hose-fed fixture, but the draining idea stays the same for each type.
Remove water from every part that can hold it, including the head, hose, valves, and floor. Do not wait until the ground is frozen to find the shutoff.
Locate the valve while the shower still works, label it if needed, and test that it closes fully.
What supplies do you need before you start?
Gather towels, a bucket, a wrench, a screwdriver, a wet vacuum, and a drain brush before you turn off the water.
A small air compressor is useful only when the fixture maker allows forced-air draining.
Lay towels around the base and place a bucket under the lowest drain point.
You will use the bucket to catch water from the lines and to rinse debris from the drain.
Keep a flashlight nearby for inspecting the drain trap and low fittings.
Check the drain cover before draining.
Loosen the screws or clips, lift the cover, and remove leaves, sand, and hair by hand.
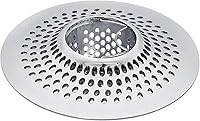
A strainer that lifts out makes this part faster, which is one reason a removable catcher suits outdoor use.
The LEKEYE catcher is stainless steel, measures 4.4 by 1.4 inches, and fits a 4.4 inch drain opening.
Its two-part design lets you lift the basket, wipe it clean, and replace it without tools.
Measure your drain first, since a catcher that sits too loose can let debris pass.
How do you shut off and empty the supply lines?
Shut off the main supply before you open the shower faucets.
Close the nearest shutoff valve, then open the hot and cold handles to release pressure.
Let the water run until it slows to drips, then move to the lowest point.
Disconnect a hose at its lowest end and point it into a bucket.
Open any drain caps or bleed valves on the run, including a small cap near the base or where the line turns underground.
If yours has no drain point, gravity and faucet position do most of the work.
Remove the shower head and detach flexible hoses without forcing a fitting.
Hang the head and hose so water can run out, then store them indoors, since a connected hose can trap water in a low loop.
How do you drain the shower floor and base?
Clear the floor drain after you empty the supply lines and remove the drain cover.
Scoop out sand, leaves, and sediment. Brush grit around the drain opening and run a small amount of water to check flow while the supply is still closed.
If water pools, the cause may be a blocked drain, a low spot in the base, or debris in the trap.
The best outdoor shower drain for this job opens and cleans without cutting caulk or removing tile. A removable grate and strainer basket help you reach trapped material outdoors.
Check a low-profile base with a center drain for cracks, warped edges, or a settled corner that can hold water.
The DreamLine SlimLine base measures 32 inches deep by 48 inches wide by 2 3/4 inches high and has a center drain.
DreamLine says it uses durable construction to limit flexing and requires professional installation.
It fits a standard 2 inch compression drain, and the drain itself is not included.
What if your outdoor shower drain is slow or blocked?
A slow drain usually means hair, sand, soap residue, or yard debris is blocking the grate or trap.
Remove the cover and strainer. Inspect the opening with a flashlight, pull out visible material by hand, and rinse the basket.
Use a drain brush for material just below the opening. Avoid aggressive tools that can scratch a grate or damage a trap.
If water still pools, check the outdoor shower drainage system below the base, where leaves, soil, and roots can block the exterior line. Clear the outside outlet and confirm a clear downhill path away from the base.
Do not pour chemicals into the drain without checking local rules and the drain material. Call a plumber for a buried line that a brush and flush cannot clear.
The WEBANG drain is 6 inches square, uses SUS 304 stainless steel, and has a 2 inch central outlet.
WEBANG says it can drain 5.28 to 6.6 gallons per minute and includes a flange, threaded adapter, rubber coupler, hair strainer, and lifting hook.
Its matte black finish suits a modern outdoor shower, and the removable parts simplify cleaning.
How do you protect exposed pipes from freezing?
Protect exposed pipes by emptying them, leaving faucets open, and insulating remaining vulnerable runs.
Draining is the main defense, since air in an empty pipe does not expand like trapped water.
Wrap exposed valves and short runs with foam insulation after draining, keep it dry, and secure it without crushing the foam.
Insulation helps during brief cold snaps, but it cannot replace draining for long winter storage.
Disconnect and store garden hoses, sprayers, and portable shower heads indoors with openings facing down, since a connected hose can hold water in the valve.
Consider the best outdoor shower tray or best outdoor shower base with drain if your floor holds water after draining, and compare size, drain position, and material before choosing a replacement.
Can you use antifreeze or compressed air?
Use antifreeze or compressed air only when the shower and plumbing maker allows it.
Some seals, finishes, or valves do not suit antifreeze, and forced air can damage a weak joint. Low pressure air can push water from a straight line when gravity draining leaves a low pocket.
Keep pressure modest, open the farthest faucet first, and stop if a fitting moves or leaks. For many fixed outdoor showers, gravity draining plus open faucets is enough, and compressed air is most helpful for long horizontal runs or multiple fixtures.
If you use antifreeze, choose a type approved for your plumbing and local code, pour only the amount required, and catch the discharge to protect soil and plants. Never use automotive antifreeze, and never leave antifreeze where pets or wildlife can drink it.
When in doubt, ask a plumber to check low points before the first freeze.
How do you restart an outdoor shower in spring?
Restart an outdoor shower slowly, with the faucets open and the drain cover removed.
Close drain caps, reconnect hoses, and turn on the supply a quarter turn at a time. Listen for leaks at valves, hose connections, and the shower head.
Check the base and drain for water pooling, then run the shower for several minutes to flush sediment from the lines. Close the faucets only after the water runs clear.
Inspect the drain strainer and clean it before the first use, since sand and winter debris often settle in the trap during storage.
If you plan a portable setup for warm weather, compare the best portable heated outdoor shower with a fixed base. A portable unit can be stored indoors in winter, while a fixed shower needs the full draining routine each fall.
How do you choose parts that make draining easier?
Choose parts that open, lift out, and rinse clean in minutes.
Outdoor showers face sand, leaves, pollen, and sunscreen. Access matters as much as flow rate, so pick a drain with a removable grate, a strainer basket, and standard fittings.
The WEBANG unit suits buyers who want a square 6 inch opening and included adapters. The LEKEYE catcher suits a simpler retrofit when the existing opening measures about 4.4 inches.
The DreamLine base suits a 32 by 48 inch alcove-style space and a standard 2 inch drain. Measure the space, confirm drain location, and check whether professional installation is required before ordering.
Also compare the Indoor Sauna vs Outdoor Sauna: What Changes if your shower sits beside a sauna. You can also read [What Is an Outdoor Sauna?
Backyard Heat Rooms](/what-is-an-outdoor-sauna/) to plan the shared outdoor area.
What is the fastest draining routine to remember?
Remember this order: shut off, open, drain, clear, and leave open.
Shut off the supply, open the faucets, drain low points, clear the floor drain, and leave the faucets open for storage.
Pick the LEKEYE catcher if your drain opening is near 4.4 inches and you want a simple removable strainer.
Pick the WEBANG drain if you want a 6 inch square grate with included adapters and a strainer basket.
Pick the DreamLine base if your space fits 32 by 48 inches and you want a center-drain base with a firm, low profile.
That routine answers how to drain an outdoor shower without guesswork.
It empties the lines, clears the floor, protects exposed fittings, and makes spring restart a short check instead of a repair job.
Frequently asked questions
How do you drain an outdoor shower for winter?
Shut off the main supply, open the shower faucets, and drain the lines from the lowest point. Remove the drain cover, clear hair and sediment, and leave faucets open.
Use air or a wet vacuum only if your fixture maker allows it, and follow local rules for antifreeze.
Can trapped water damage an outdoor shower?
Yes. Water expands when it freezes and can split pipes, crack valves, or loosen fittings.
Emptying supply lines and the shower floor before hard freezes lowers that risk.
A drain alone does not protect raised pipes or the shower head.
How often should you clean an outdoor shower drain?
Check it monthly during heavy use and again before winter storage. Sand, leaves, hair, and sunscreen residue can slow drainage and hold water on the floor.
A removable strainer makes routine cleaning faster and helps you spot a blockage early.