How to Build a DIY Cold Plunge Tub
A DIY cold plunge tub is built by picking a tub, adding a filter and pump, and adding a chiller to hold cold water. Plan power, drainage, and water quality before you buy parts.
On this page (9 sections)
- What is a DIY cold plunge tub and why build one?
- How do you size a DIY cold plunge tub for your space?
- Where should you place a DIY cold plunge tub?
- How do you add filtration to a DIY cold plunge tub?
- How do you add a chiller to a DIY cold plunge tub?
- What safety checks matter before your first plunge?
- How do you clean and maintain a DIY cold plunge tub?
- What mistakes should you avoid when building a DIY plunge?
- How do you decide if a DIY cold plunge tub is right for you?
A DIY cold plunge tub is a home tub built from separate parts, not a single ready-made unit. You choose the tub, add a pump and filter, and add a chiller or use ice to keep water cold.
This guide explains planning and assembly in build order. We compared specs and owner patterns so you can match parts without buying twice.
What is a DIY cold plunge tub and why build one?
A DIY cold plunge tub is a large tub paired with separate filtration and cooling parts. That split lets you size the tub to your space and upgrade the chiller or filter later.
It suits people who want a custom size, a tank that fits a corner, or a setup they can move. It also suits people who like fixing standard parts instead of replacing a whole unit.
A ready-made kit can be simpler, and our guide to the best DIY cold plunge kit covers that route. A DIY build gives more control, but you own every fit and connection.
If you are not sure what a plunge does, start with what's a cold plunge. That overview explains the basic idea before you spend on parts.
Which parts make up the system?
The core parts are a tub, a pump, a filter, and a chiller. You also need hoses, clamps, a drain, a lid, and a thermometer.
Each part has one job. The tub holds you and the water, the pump moves water, the filter cleans it, and the chiller cools it.
Think of the system as a loop. Water leaves the tub, passes through the filter, then through the chiller, and returns to the tub.
How do you size a DIY cold plunge tub for your space?
Size a DIY cold plunge tub by your body first and your floor space second. Sit in the tub before you buy so you know if your knees bend too much or your shoulders sit out of the water.
A deep, narrow tub saves water and cools faster. A wide tub feels roomier but needs more chiller power and more ice if you skip a chiller.
Measure doorways, hall turns, and the final spot. A filled tub is heavy and hard to move, so plan where it will sit before the first fill.
What tub types work best?
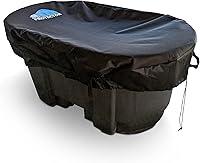
A stock tank works well because its walls are rigid and its shape fits one person. A large plastic tub can work, but check that the walls do not bow under full water weight.
A converted chest freezer is not a good tub choice. Its insulation and liner are built for frozen food, not for a person sitting in cold water.
For outdoor use, compare tub size, cover fit, and drain access in our best outdoor cold plunge tub guide. Sun, rain, and debris change what a good tub needs.
Where should you place a DIY cold plunge tub?
Place a DIY cold plunge tub on flat, level ground that can hold the full weight. A filled tub with a person in it can weigh several hundred pounds, so concrete or a strong deck matters.
Keep power outlets dry and at a safe distance from the water. Use ground fault protection where required and keep cords out of puddles and foot traffic.
Leave room to climb in and out without slipping. A step, a firm mat, and a drain path that does not flood a walkway all help.
Consider drainage before the first fill. You need a plan to empty the tub for cleaning, and a hose or pump that sends water where you want it.
Indoors, check floor drains, ceiling height, and ventilation. Cold water can create condensation, so airflow helps protect nearby walls and floors.
How do you add filtration to a DIY cold plunge tub?
Add filtration so hair, skin oils, and debris do not build up in standing water. A pump and filter move water through a cartridge or sand bed so the same water can stay in use longer with care.
Our guide to a DIY cold plunge filter explains sizing, plumbing order, and cleaning routines. The filter type should match your pump flow, not just the tub size.
Put the pump and filter where you can reach them for cleaning. You will check the cartridge often at first, and easy access makes that habit stick.
What plumbing order should you use?
Run water from the tub to the pump, then to the filter, then to the chiller, and back to the tub. That order protects the chiller from debris and keeps filtered water as the return flow.
Use short, straight runs where you can. Long hoses add friction, slow flow, and make air bubbles more likely at start-up.
Prime the pump as its maker directs before you run it dry. Air in the line can stop flow and make a new build seem broken when it only needs priming.
Check every clamp and union after the first fill. Small drips at a fitting can grow once water pressure and temperature settle.
How do you add a chiller to a DIY cold plunge tub?
Add a chiller if you want steady cold water without buying ice every session. Our guide to a DIY cold plunge chiller covers sizing by tub volume, outdoor rating, and drain needs.
A chiller needs airflow around it and a clear path for condensate or rinse water. On a deck or patio, leave space behind and below the unit.
Ice is a lower-cost start, but it is less steady. You add ice, wait for it to melt, and check the temperature again before each use.
How do you know the chiller size is right?
Match chiller size to water volume and your climate. A large tub in warm sun needs more cooling than a small tub in a cool garage.
Check the maker's stated minimum and maximum water volume before you order. A unit that is too small will run long and still leave water warmer than your target.
Also check power needs and noise. A chiller that runs for hours will be noticed in a quiet yard or a shared wall.
Set a target with a thermometer, not by feel. Our guide to what temperature is a cold plunge helps you pick a range and test one session at a time.
What safety checks matter before your first plunge?
Check safety before your first plunge in a DIY cold plunge tub. Cold water stresses the heart and blood pressure, so people with heart conditions, high blood pressure, or circulation problems should ask a doctor first.
Start with short sessions and a calm exit. Never lock a lid from the outside, and never use a plunge alone if you feel faint, dizzy, or unusually short of breath.
Keep the area clear of electrical cords and wet floors. Use a step or rails if the tub wall is high, and keep children and pets away from the water.
Shower or rinse before you get in. That step cuts oils and debris and helps your filter last longer.
The Herbal Zen Cold Kicker Shower Steamers come in a 10 pack with peppermint and eucalyptus essential oils, which can make a post-plunge shower feel more invigorating.
The brand says the steamers use natural essential oils with no artificial fragrance. They are a comfort add-on, not a safety or water-quality part.
How do you clean and maintain a DIY cold plunge tub?
Clean a DIY cold plunge tub on a schedule, not when the water looks cloudy. Cloudy water is a late sign, and the filter cartridge often needs a rinse well before that point.
Check the filter often at first and note how fast it loads. Hair and body oils load a cartridge faster than dust alone, so your rinse routine should match real use.
Test water with a thermometer each time you change water. Replace water after heavy use, after contamination, and at the interval your filter maker recommends.
Dry the tub rim and floor around it after each use. Standing moisture invites mold around clamps, lids, and deck boards.
For a simpler start, see how to make a cold plunge for bathtub setup with ice and a small filter. That route teaches water care before you commit to a full build.
What mistakes should you avoid when building a DIY plunge?
Avoid the most common DIY cold plunge tub mistakes by checking fit before you fill. The top mistake is buying a tub that is too shallow for your legs or too wide for your space.
The next mistake is skipping the filter. A chiller alone does not clean water, and debris can clog pumps and exchangers.
A third mistake is placing the chiller where hot air cannot escape. That mistake shows up as long run times and water that never reaches your target.
A fourth mistake is ignoring drainage. A tub you cannot empty cleanly will be harder to clean and harder to move.
Read the sauna and cold plunge benefits guide for context on pairing heat and cold. That guide also helps you decide if a plunge fits your routine before you build.
How do you decide if a DIY cold plunge tub is right for you?
Choose a DIY cold plunge tub if you want control over size, parts, and cost. You can start with a stock tank and ice, then add a filter or chiller when your routine is set.
Choose a ready-made kit if you want matched parts and one support path. That choice often saves time even if the upfront cost is higher.
For this build, buy in order: tub first, then pump and filter, then chiller. Measure each step so hoses and fittings match.
Keep a simple log of water changes, filter rinses, and temperature checks. That log tells you when a part is undersized and when the setup is ready to use with confidence.
Frequently asked questions
How much does a DIY cold plunge tub cost?
Cost depends on the tub, chiller, pump, and filter you choose, so we compared part categories rather than a single total. A stock tank and ice can cost less at first, while a dedicated chiller and filter add more up front but hold temperature with less daily work.
Can I use a stock tank for a cold plunge?
Yes, many people use a large stock tank because it is sturdy, wide, and simple to drain. Check wall strength, insulation, and fittings before filling it, and confirm the tank can handle a pump and filter without leaking at the connections.
How cold should DIY plunge water be?
Use our guide to what temperature is a cold plunge to set a target range and check it with a thermometer. Start conservatively, keep sessions short, and skip cold plunging if you have a heart or blood pressure condition unless your doctor says it is safe.